How we built Hamiltix.net for less than $1 a month on AWS
The details of running a complex ticket ranking site for under a dollar a month on AWS
Background
Hamilton the musical is hot. Really hot. With crazy high ticket prices, finding the best deal should be easy, especially if you live in New York City, Chicago, or a city on the US Tour. You just go to a major ticket resale site, and search across all the dates you are able to attend and... wait... no site supports ranking tickets across dates? And their "deal rankings" don't take into account the intricacies of each theatre (viewing obstructions, etc)!? I guess we'll have to build it ourselves!
For a full background on the motivations behind hamiltix.net checkout the hamiltix.net blog.
From simple script to legitimate website
Being a python programmer it didn't take long to scrape the major ticket sites and rank all the tickets with a custom algorithm. This turned up some interesting results, and it was easy to compare the best tickets for any dates, sections, and theaters we wanted. This was great for personal use, but not very accessible to an average Hamilton-goer (and despite being perfectly legal it may draw the irk of the sites we are scraping). Time to legitimize our data collection and make it presentable.
This lead to a long slog through the secondary ticket market, which was actually quite interesting, and will be detailed on the hamiltix.net blog. The end state was we connected with a "ticket broker" network and are able to access their inventory (spoiler: nearly all secondary ticket sites share the same inventory). With live tickets at our fingertips the question became how do we process all the data and present it on the cheap?
AWS - Power, Complexity, Affordability
Enter Amazon Web Services (AWS). AWS is the cloud service provider that powers may of the biggest names on the internet so lets see how it does with a simple static site and backend.
Normally, the first step for this kind of project is to start up a linux server, but serverless computing is on the rise. We've never dealt with Lambda or any other "serverless" technology before so lets give it a shot.
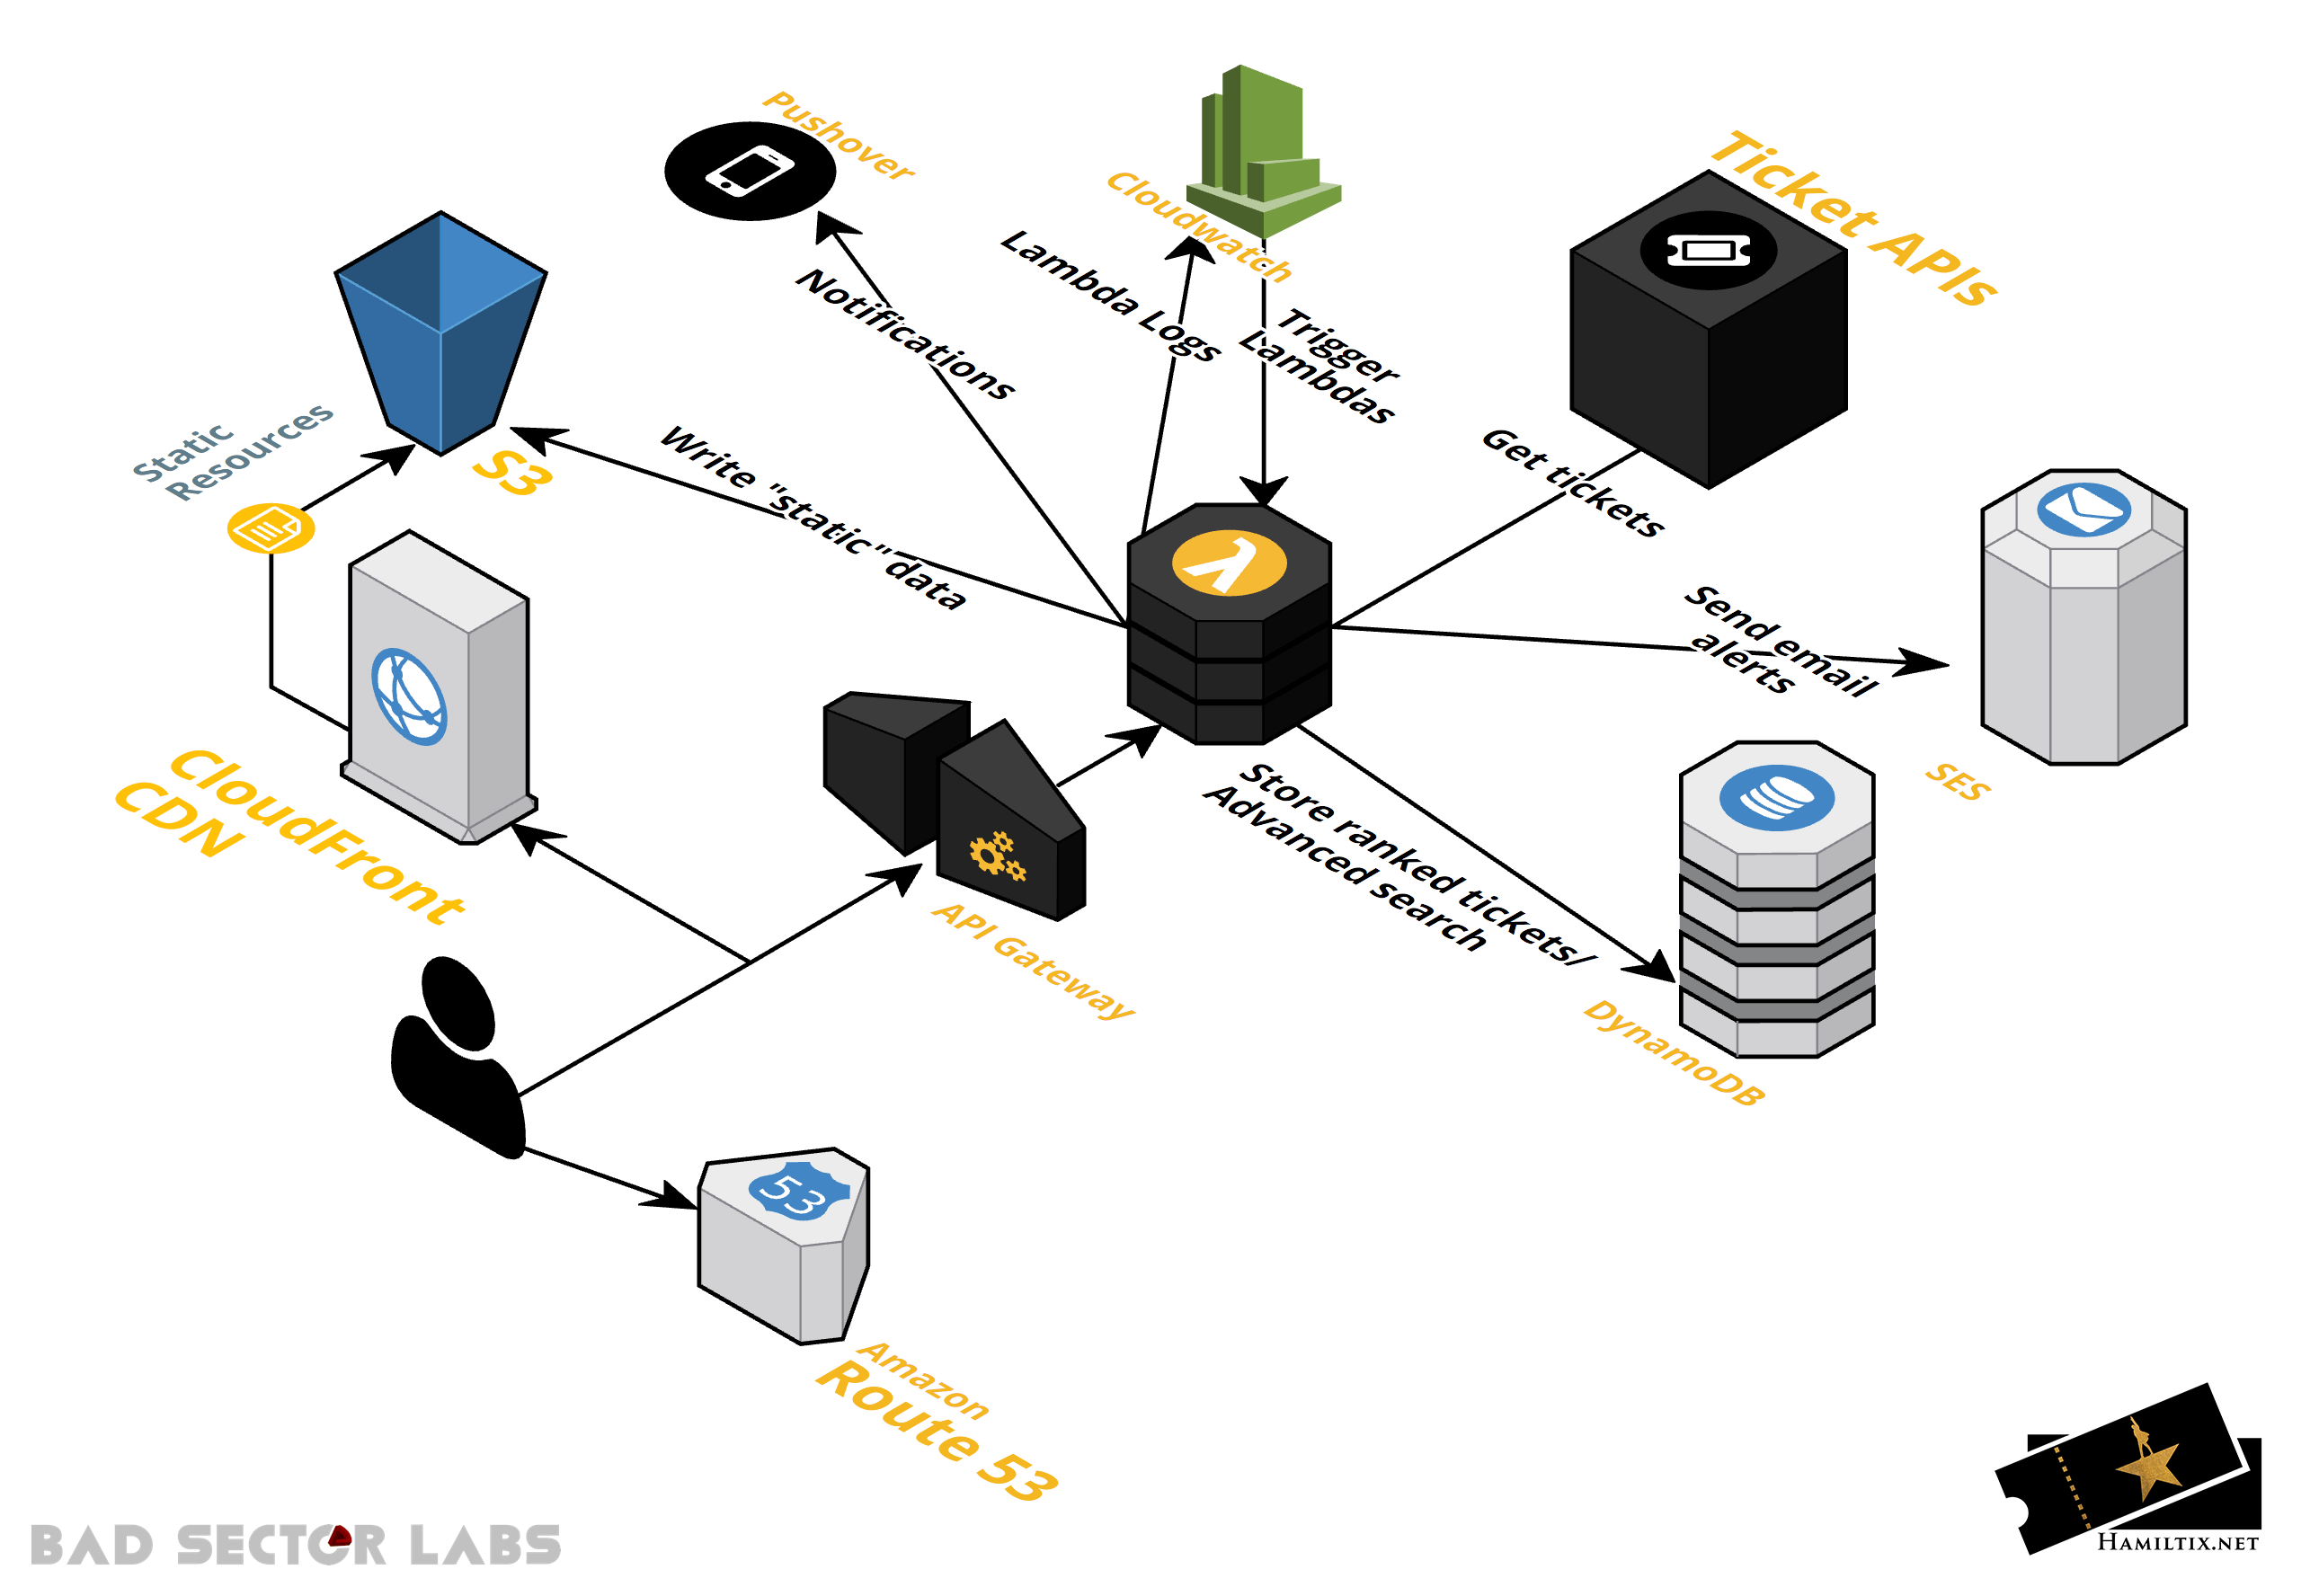
The overall design of hamiltix looks like this:

As you can see, Lambda is the star of the show. If you haven't heard of Lambda before, you can think of it as a service that will run a function (however complex) on a trigger (there are too many to list, basically any AWS service can trigger a lambda). Lambda offers Node.js, Python (2.7 and 3.6), Java (8+), C# (.NET Core), and Go environments. Since we already had the ranking module in Python, we stuck with Python (3 of course) for the rest of the functions as well.
Cloudwatch event rules kick off any Lambdas that need to run on intervals (getting and ranking tickets), and API Gateway fires any "dynamic" content for the website like advanced search, or the actual ticket purchasing.
We also made the decision to not use a javascript framework for the front end, mostly because they are incredebly complex and some people suggest they are all terrible (or maybe great?). Could be use React with a static site? Sure, but that also means dealing with animated routes, custom routing, GraphQL, Redux, Sass or Less, JSX... I'm already exhausted. We just want to present tickets cleanly to users, not build the next Facebook. jQuery, SweetAlert2, Semantic-ui, Moment.js, and MutliDatesPicker are the only external javascript libraries used on hamiltix.net.
Without the need for a server hosting the site, it can be stored on S3 and distributed by Cloudfront. Setting up a
static site with AWS
is fairly simple. Any
ajax calls in the site's javascript are sent to the API Gateway which in turn calls the correct lambda function to
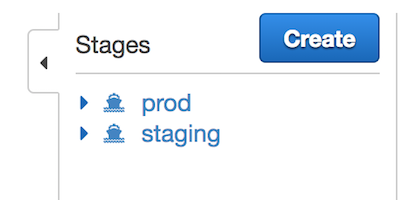
handle whatever task is requested. With hamilton ticket prices as high as they are, we set up a staging environment that
uses our ticket broker's sandbox API to test all functions on each commit to master. For this to work, you need two
separate environments in API Gateway, and the corresponding aliases for your lambda functions (don't forget to publish
the changes in API Gateway!).

While in the API Gateway, you have to point the lambda handler to the function alias that corresponds to either staging
or prod. This can be done with a stageVariable when setting up the endpoint in the Resources screen of API Gateway.
You'll need to allow API Gateway permissions to access each alias you use, but AWS provides a nice aws-cli command
for you when you set up the Lambda proxy integration.

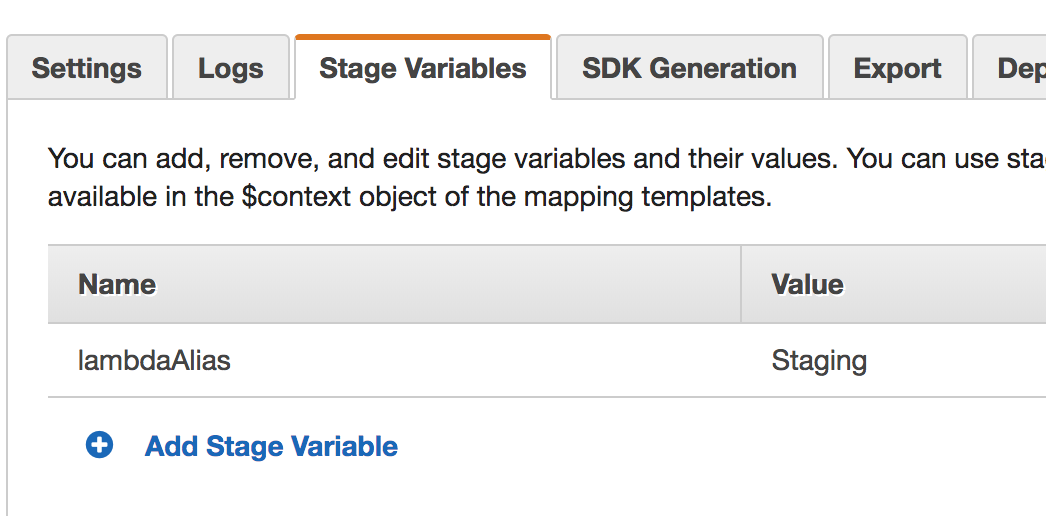
Then in the Stages screen, ensure that each stage as an appropriate Stage Variable.

Now the staging and prod APIs will call the Staging and Prod lambda aliases respectively. Setting up staging and prod
lambda aliases is not difficult, and is handled by Gitlab's CI/CD pipeline.
CI/CD
If you've read my first post
you know I'm a big fan of Gitlab and its built in CI/CD. The hamiltix repo is set up with each lambda as a
submodule because Gitlab currently does not support more than one .gitlab-ci.yml file for a repo. The
gitlab-ci.yml files for each lambda are nearly identical (on purpose!), only the variables section at the top and
the additional cp statements for custom directories (if needed) change between lambda functions. Strict
twelve-factor followers will notice that the build and release stages are
combined. It is certianlly possible to break the build step out and pass the zip as an artifact, but the stage is so
fast we haven't done this yet.
variables:
  #  Set git strategy
  GIT_STRATEGY: clone
  GIT_SUBMODULE_STRATEGY: recursive
  # Keys and secrets are defined in the project CI settings and exposed as env variables
  AWS_ACCESS_KEY_ID: $AWS_ACCESS_KEY_ID
  AWS_SECRET_ACCESS_KEY: $AWS_SECRET_ACCESS_KEY
  AWS_DEFAULT_REGION: "us-east-1"
  NAME: "MyFunction"
  FILENAME: "MyFunction.py"
  HANDLER: "MyFunction.lambda_handler"
  RUNTIME: "python3.6"
  ROLE: "arn:aws:iam::XXXXXXXXXXXXX:role/XXXXXXXXXX"
  FILE: "fileb://deploy_$CI_COMMIT_REF_NAME.zip"

stages:
  - test
  - deploy

test:
  stage: test
  image: badsectorlabs/code-checking:latest # This is a docker image that contains a lot of code checking tools
  script:
    - cpd --minimum-tokens 100 --language python --files .
    # pylint output is good to look at, but not worth breaking the build over
    - pylint -d bad-continuation -d line-too-long -d import-error -d missing-docstring $FILENAME || true
    - flake8 --max-line-length 120 --ignore=E722,W503 . # You must pass flake8 (W503 is wrong, pep8 changed)

deploy-staging:
  stage: deploy
  image: badsectorlabs/aws-compress-and-deploy:latest
  variables:
    ALIAS: "Staging"
    DESC: "Staging build, commit: $CI_COMMIT_SHA"
  script:
    - virtualenv -p /usr/bin/python3.6 env
    - source env/bin/activate
    - pip install -r requirements.txt
    - mkdir dist
    - cp $FILENAME dist # copy all files needed to dist
    # Copy any other directories (modules, etc) here
    - cp -rf env/lib/python3.6/site-packages/* dist
    - cd dist
    - zip -r9 ../deploy_$CI_COMMIT_REF_NAME.zip .
    - cd ..
    - deactivate
    - ls -lart
    - echo Creating or updating $NAME
    - > # This captures the code hash for the updated/created lambda function; -r is needed with jq to strip the quotes
      CODE_SHA_256=$(aws lambda update-function-code --function-name $NAME --zip-file $FILE | jq -r ."CodeSha256" || aws lambda create-function
      --function-name $NAME --runtime $RUNTIME --role $ROLE --handler $HANDLER --zip-file $FILE | jq -r ."CodeSha256")
    - echo Publishing LATEST, CodeSha256=$CODE_SHA_256, as 'Staging'
    - VERSION=$(aws lambda publish-version --function-name $NAME --description "$DESC" --code-sha-256 $CODE_SHA_256 | jq -r ."Version")
    - echo "Published LATEST as version $VERSION"
    - >
      aws lambda update-alias --function-name $NAME --name $ALIAS --function-version $VERSION || aws lambda create-alias
      --function-name $NAME --name $ALIAS --description "Staging" --function-version $VERSION
    - echo Successfully updated $NAME:$ALIAS
  environment:
    name: master-staging
  only:
    - master

deploy-prod:
  stage: deploy
  image: badsectorlabs/aws-compress-and-deploy:latest
  variables:
    ALIAS: "Prod"
    DESC: "Prod build, commit: $CI_COMMIT_SHA"
  script:
    - virtualenv -p /usr/bin/python3.6 env
    - source env/bin/activate
    - pip install -r requirements.txt
    - mkdir dist
    - cp $FILENAME dist # copy all files needed to dist
    # Copy any other directories (modules, etc) here
    - cp -rf env/lib/python3.6/site-packages/* dist
    - cd dist
    - touch PROD # This is the canary that will tell the lambda function to use the PROD secrets
    - zip -r9 ../deploy_$CI_COMMIT_REF_NAME.zip .
    - cd ..
    - deactivate
    - ls -lart
    - echo Creating or updating $NAME
    - > # This captures the code hash for the updated/created lambda function; -r is needed with jq to strip the quotes
      CODE_SHA_256=$(aws lambda update-function-code --function-name $NAME --zip-file $FILE | jq -r ."CodeSha256" || aws lambda create-function
      --function-name $NAME --runtime $RUNTIME --role $ROLE --handler $HANDLER --zip-file $FILE | jq -r ."CodeSha256")
    - echo Publishing LATEST, CodeSha256=$CODE_SHA_256, as 'Prod'
    - VERSION=$(aws lambda publish-version --function-name $NAME --description "$DESC" --code-sha-256 $CODE_SHA_256 | jq -r ."Version")
    - echo "Published LATEST as version $VERSION"
    - >
      aws lambda update-alias --function-name $NAME --name $ALIAS --function-version $VERSION || aws lambda create-alias
      --function-name $NAME --name $ALIAS --description "Prod" --function-version $VERSION
    - echo Successfully updated $NAME:$ALIAS
  environment:
    name: master-prod
  only:
    - master
  when: manual
Using this CI setup, the lambda can check for PROD with if os.path.exists('PROD'): and if so read in env
variables for the production environment, and otherwise use staging variables. Note that both staging and production
variables must be defined in the lambda settings (aliases take a snapshot of the lambda settings to prevent a setting
change from breaking aliases that already exist).
The CI setup for pushing the static site assets looks nearly identical to the setup for this blog.
Logging and Monitoring
Once you have some lambdas working away for you, it becomes necessary to monitor them. By default the lambdas will log any standard out to Cloudwatch, which is nice if you need to go back and see what caused an issue, but doesn't help alert you when an issue occurs. There are many ways to solve this issue, including many that would leverage AWS services but I already had a lifetime Pushover account, so decided to use it for instant push notifications on any unhandled lambda error.
def send_pushover(message, title, sound='pushover'):
    """
    Send a pushover message
    :param message: string; the message to send
    :param title: string; the title of the message
    :param sound: string; one of the keys of {'pushover': 'Pushover (default)', 'bike': 'Bike', 'bugle': 'Bugle',
                          'cashregister': 'Cash Register', 'classical': 'Classical', 'cosmic': 'Cosmic',
                          'falling': 'Falling', 'gamelan': 'Gamelan', 'incoming': 'Incoming',
                          'intermission': 'Intermission', 'magic': 'Magic', 'mechanical': 'Mechanical',
                          'pianobar': 'Piano Bar', 'siren': 'Siren', 'spacealarm': 'Space Alarm', 'tugboat': 'Tug Boat',
                          'alien': 'Alien Alarm (long)', 'climb': 'Climb (long)', 'persistent': 'Persistent (long)',
                          'echo': 'Pushover Echo (long)', 'updown': 'Up Down (long)', 'none': 'None (silent)'}
    :return: None
    """
    from pushover import init as pushover_init # install with `pip3 install python-pushover`
    from pushover import Client
    # Send Pushover notification via the API (this is the hamiltix key)
    pushover_init('XXXXXXXXXXXXXXXXXXXXXXXXXXXXX')
    client = Client('XXXXXXXXXXXXXXXXXXXXXXXXXXXXX')
    client.send_message(message, title=title, sound=sound)


def lambda_handler(event, context):
    try:
        return main(event, context)
    except Exception as e:
        print('[FATAL] Caught exception: {}'.format(e))
        import traceback
        error_trace = traceback.format_exc()
        print(error_trace)
        error_title = 'Error in [LambdaFunctionName]'
        send_pushover(error_trace, error_title, sound='falling')
        raise(e)  # Make sure the lambda function returns a 500
Getting a push alert any time there is an error helps us respond to issues as soon as they come up. The same
send_pushover() is used to alert on other things as well, like any time a ticket is purchaced (with the cash
register sound naturally).
Cost
So how much does it cost to run hamiltix.net? Right now we are still in the 12 month AWS "free-tier" and monthly cost is stable at around $0.60, of which $0.50 is Route53 (one hosted zone) and the rest is S3 and taxes. After the "free-tier" expires our S3 costs will increase slightly, API Gateway will be $0.09 per GB of data transferred out, and Cloudfront will be $0.085 for the first 10TB a month but Lambda, DynamoDB, and Cloudwatch will remain free (unless we get really popular!), and costs should remain under $1. Reddit has correced my error, and API Gateway has a base fee of $3.50 for the first 1 million requests. After the free-tier expires costs should remain under $5. If we wanted to bring this down even more, moving the domain to Google Domains (or similar) would reduce our current costs by 80%!